Extending a VXLAN across nodes with Wireguard
Virtualizing environments is something I do quite often in a day-to-day basis, usually, these environments live in different hypervisors. While I don’t always need these environments to talk to each other, from time to time I need some sort of connectivity between them.
Getting the VMs running on these hypervisors routed through the lab network is one of the solutions I have been using for a long time. For the last few days, I have been thinking of extending a virtual network across two hypervisors. This allows me to run VMs on this virtual network and get VMs to talk to each other without having to run these VMs in a routed lab network.
For this solution to work, we will be using Wireguard to create a tunnel between the two hypervisors using a routed lab network and VXLAN to encapsulate our virtual network in the Wireguard tunnel.
The instructions in this blog were tested on RHEL 9. This focuses on IPv4 VXLAN network, but the same should be doable with IPv6.
Warning
I’m far (like really far) from being a Networking expert, take the information in this post with a grain of salt since it may not be 100% accurate (but it works though).
Solution Overview
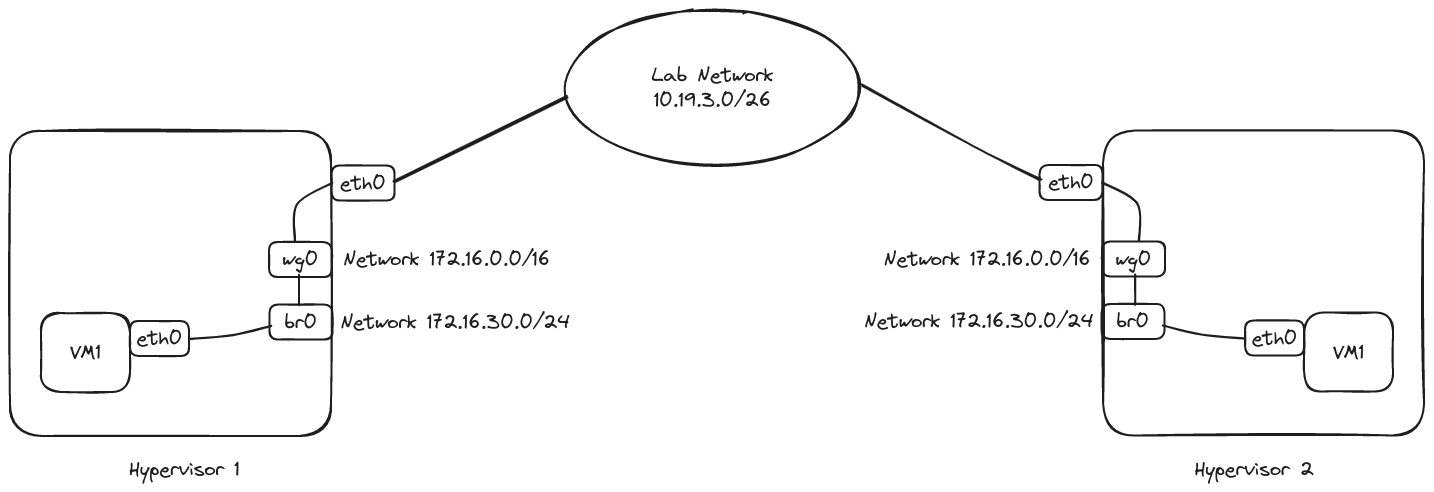
In the diagram above we can see we have two hypervisors which are connected to a routed lab network via their eth0 interface. We will configure a Wireguard tunnel using this interface, the Wireguard interface will be named wg0. On top of that, we will configure a VXLAN interface that we will connect to the bridge named br0 which will be configured to send traffic via the wg0 tunnel.
Both hypervisors will follow this setup. When we create a VM on these hypervisors, we will connect the VM’s eth0 interface to the bridge br0 and that will place the VM in the VXLAN network. If everything goes according to the plan, we will be able to connect from VM1 in Hypervisor 1 to VM1 in Hypervisor 2 and vice versa.
Installing Wireguard
Attention
Steps below must be done on every hypervisor node.
Install
epel-releaserepository by following the instructions here.Install
elreporepository by following the instructions here.Install the required packages:
sudo dnf install -y kmod-wireguard wireguard-tools bridge-utilsMake sure the
wireguardkernel module is loaded (if you get an error when trying to load the module, you may need to reboot into a newer kernel):sudo modprobe wireguardAttention
If you get the following error when trying to load the module:
modprobe: ERROR: could not insert 'wireguard': Required key not available.This means that you are trying to use ELRepo’s kernel modules (kmod packages) on a system with Secure Boot enabled, therefore this must import the ELRepo Secure Boot public key into their Machine Owner Key (MOK) list.
sudo curl -L https://elrepo.org/SECURE-BOOT-KEY-elrepo.org.der -o /etc/pki/elrepo/SECURE-BOOT-KEY-elrepo.org.derInstall the downloaded key:
sudo mokutil --import /etc/pki/elrepo/SECURE-BOOT-KEY-elrepo.org.derWhen prompted, enter a password of your choice. This password will be used when enrolling the key into the MOK list. Reboot the system and follow-up the BMC interface for entrolling the MOK key. Once the boot finished:
sudo modprobe wireguardsudo lsmod | grep wireguard wireguard 212992 0 ip6_udp_tunnel 16384 1 wireguard udp_tunnel 20480 1 wireguard
Configuring Wireguard Tunnel (wg0)
First we need to enable IPv4 forwarding in both hypervisors.
cat <<EOF | sudo tee /etc/sysctl.d/wireguard.conf
net.ipv4.ip_forward=1
EOF
sudo sysctl -p /etc/sysctl.d/wireguard.conf
Generate Wireguard keys in both hypervisors.
sudo mkdir -p /etc/wireguard/certs/
sudo wg genkey > /etc/wireguard/certs/private_key
sudo wg pubkey < /etc/wireguard/certs/private_key > /etc/wireguard/certs/public_key
sudo chmod 600 /etc/wireguard/certs/private_key
sudo chmod 644 /etc/wireguard/certs/public_key
Configuring Wireguard in Hypervisor 1
- Hypervisor 1 has its
eth0interface connected to the lab network and configured with the10.19.3.4/26IP. Hypervisor 1 can reach Hypervisor 2 at10.19.3.5/26. - Hypervisor 1 will configure
172.16.0.1/16IP forwg0and will NAT traffic through itseth0which is connected to the routed lab network. - Hypervisor 1 Priv Key in this example is:
QP1LNvlaejugxgHj+DtDOX20DvBilOCn1RPRBQFakFs= - Hypervisor 1 Pub Key in this example is:
3TxNmlyWmNeL4EavtHi9dRfsqPHcEeiexKzMDF7n7nU= - Hypervisor 2 Priv Key in this example is:
sIWrsVAvFm/VIHQhHRPaCzBOTWK/jmM6NkGYEwd/oXk= - Hypervisor 2 Pub Key in this example is:
GmG2HkjvV8OebDy9ezHPG/+ODb6CMv51oSEKz4StdHQ=
Configure
wg0:Attention
Make sure you change the
PrivateKeyandPublicKeyto match the specifics for your environment.HYPERVISOR_EXT_NIC=eth0 cat <<EOF | sudo tee /etc/wireguard/wg0.conf [Interface] PrivateKey = QP1LNvlaejugxgHj+DtDOX20DvBilOCn1RPRBQFakFs= Address = 172.16.0.1/16 ListenPort = 51820 PostUp = iptables -A FORWARD -i %i -j ACCEPT; iptables -A FORWARD -o %i -j ACCEPT; iptables -t nat -A POSTROUTING -o ${HYPERVISOR_EXT_NIC} -j MASQUERADE PostDown = iptables -D FORWARD -i %i -j ACCEPT; iptables -D FORWARD -o %i -j ACCEPT; iptables -t nat -D POSTROUTING -o ${HYPERVISOR_EXT_NIC} -j MASQUERADE [Peer] PublicKey = GmG2HkjvV8OebDy9ezHPG/+ODb6CMv51oSEKz4StdHQ= Endpoint = 10.19.3.5:51820 AllowedIPs = 172.16.0.0/16 PersistentKeepalive = 25 EOF
Configuring Wireguard in Hypervisor 2
- Hypervisor 2 has its
eth0interface connected to the lab network and configured with the10.19.3.5/26IP. Hypervisor 1 can reach Hypervisor 1 at10.19.3.4/26. - Hypervisor 2 will configure
172.16.0.2/16IP forwg0and will NAT traffic through itseth0which is connected to the routed lab network. - Hypervisor 1 Priv Key in this example is:
QP1LNvlaejugxgHj+DtDOX20DvBilOCn1RPRBQFakFs= - Hypervisor 1 Pub Key in this example is:
3TxNmlyWmNeL4EavtHi9dRfsqPHcEeiexKzMDF7n7nU= - Hypervisor 2 Priv Key in this example is:
sIWrsVAvFm/VIHQhHRPaCzBOTWK/jmM6NkGYEwd/oXk= - Hypervisor 2 Pub Key in this example is:
GmG2HkjvV8OebDy9ezHPG/+ODb6CMv51oSEKz4StdHQ=
Configure
wg0:Attention
Make sure you change the
PrivateKeyandPublicKeyto match the specifics for your environment.HYPERVISOR_EXT_NIC=eth0 cat <<EOF | sudo tee /etc/wireguard/wg0.conf [Interface] PrivateKey = sIWrsVAvFm/VIHQhHRPaCzBOTWK/jmM6NkGYEwd/oXk= Address = 172.16.0.2/16 ListenPort = 51820 PostUp = iptables -A FORWARD -i %i -j ACCEPT; iptables -A FORWARD -o %i -j ACCEPT; iptables -t nat -A POSTROUTING -o ${HYPERVISOR_EXT_NIC} -j MASQUERADE PostDown = iptables -D FORWARD -i %i -j ACCEPT; iptables -D FORWARD -o %i -j ACCEPT; iptables -t nat -D POSTROUTING -o ${HYPERVISOR_EXT_NIC} -j MASQUERADE [Peer] PublicKey = 3TxNmlyWmNeL4EavtHi9dRfsqPHcEeiexKzMDF7n7nU= Endpoint = 10.19.3.4:51820 AllowedIPs = 172.16.0.0/16 PersistentKeepalive = 25 EOF
Starting and verifying Wireguard Tunnel
In both hypervisors run the following command:
sudo systemctl enable wg-quick@wg0.service --now
If everything went well, Hypervisors should be able to reach each other over the 172.16.0.0/16 network.
We can check
wg0state in Hypervisor 1:wg show wg0interface: wg0 public key: 3TxNmlyWmNeL4EavtHi9dRfsqPHcEeiexKzMDF7n7nU= private key: (hidden) listening port: 51820 peer: GmG2HkjvV8OebDy9ezHPG/+ODb6CMv51oSEKz4StdHQ= endpoint: 10.19.3.5:51820 allowed ips: 172.16.0.0/16 latest handshake: 1 minute, 15 seconds ago transfer: 1.56 MiB received, 105.65 MiB sentSame in Hypervisor 2:
wg show wg0interface: wg0 public key: GmG2HkjvV8OebDy9ezHPG/+ODb6CMv51oSEKz4StdHQ= private key: (hidden) listening port: 51820 peer: 3TxNmlyWmNeL4EavtHi9dRfsqPHcEeiexKzMDF7n7nU= endpoint: 10.19.3.4:51820 allowed ips: 172.16.0.0/16 latest handshake: 1 minute, 21 seconds ago transfer: 105.76 MiB received, 1.82 MiB sentHypervisor 1 pings Hypervisor 2:
ping -I wg0 -c 1 172.16.0.2PING 172.16.0.2 (172.16.0.2) from 172.16.0.1 wg0: 56(84) bytes of data. 64 bytes from 172.16.0.2: icmp_seq=1 ttl=64 time=0.523 ms --- 172.16.0.2 ping statistics --- 1 packets transmitted, 1 received, 0% packet loss, time 0ms rtt min/avg/max/mdev = 0.523/0.523/0.523/0.000 ms
Configuring VXLAN (br0)
Now that we have the Wireguard tunnel up and running, next step is defining the VXLAN interface, plug it to a bridge interface and get the traffic encapsulated in the Wireguard tunnel.
In this example the VXLAN has a CIDR 172.16.30.0/24.
Configuring VXLAN in Hypervisor 1
- Hypervisor 1 has its
wg0interface configured with the172.16.0.1IP and can reach the Hypervisor 2 at172.16.0.2through the Wireguard tunnel. - Hypervisor 1 will configure
172.16.30.1/16IP forbr0.to-node2VXLAN interface will be configured with the172.16.0.2remote and plugged into thebr0interface.
Below commands rely on the nmcli tool, if your environment do not have it, you can refer to alternative commands to nmcli section.
Create the bridge interface:
Attention
I’m creating the bridge with spanning tree protocol disabled, you may want to enable it depending on your lab needs.
sudo nmcli con add ifname br0 type bridge con-name br0 stp no ipv4.addresses 172.16.30.1/24 ipv4.method manualCreate the VXLAN interface:
sudo nmcli con add ifname to-node2 type vxlan con-name to-node2 remote 172.16.0.2 id 1 destination-port 4789 ipv4.method disabledAdd the VXLAN interface to the bridge:
sudo nmcli con modify to-node2 master br0Bring up the bridge interface:
Warning
Be patient, the bridge may take a few seconds to be up.
sudo nmcli con up br0
Configuring VXLAN in Hypervisor 2
- Hypervisor 2 has its
wg0interface configured with the172.16.0.2IP and can reach the Hypervisor 1 at172.16.0.1through the Wireguard tunnel. - Hypervisor 2 will configure
172.16.30.2/16IP forbr0.to-node1VXLAN interface will be configured with the172.16.0.1remote and plugged into thebr0interface.
Create the bridge interface:
Attention
I’m creating the bridge with spanning tree protocol disabled, you may want to enable it depending on your lab needs.
sudo nmcli con add ifname br0 type bridge con-name br0 stp no ipv4.addresses 172.16.30.2/24 ipv4.method manualCreate the VXLAN interface:
sudo nmcli con add ifname to-node1 type vxlan con-name to-node1 remote 172.16.0.1 id 1 destination-port 4789 ipv4.method disabledAdd the VXLAN interface to the bridge:
sudo nmcli con modify to-node1 master br0Bring up the bridge interface:
Warning
Be patient, the bridge may take a few seconds to be up.
sudo nmcli con up br0
Verifying VXLAN configuration
If everything went well, Hypervisors should be able to reach each other over the 172.16.30.0/24 network.
Hypervisor 1 pings Hypervisor 2:
ping -I br0 -c 1 172.16.30.2PING 172.16.30.2 (172.16.30.2) from 172.16.30.1 br0: 56(84) bytes of data. 64 bytes from 172.16.30.2: icmp_seq=1 ttl=64 time=1.38 ms --- 172.16.30.2 ping statistics --- 1 packets transmitted, 1 received, 0% packet loss, time 0ms rtt min/avg/max/mdev = 1.381/1.381/1.381/0.000 ms
Configuring VMs on VXLAN network
For this part I’ll be using the kcli tool to interact with my KVM Hypervisors.
If we check in our hypervisors we will have a new network available for our VMs, the
br0network of type bridged:kcli list networksListing Networks... +-----------------+---------+---------------------+-------+-------------------+----------+ | Network | Type | Cidr | Dhcp | Domain | Mode | +-----------------+---------+---------------------+-------+-------------------+----------+ | eth0 | bridged | 10.19.3.0/26 | N/A | N/A | N/A | | br0 | bridged | 172.16.30.0/24 | N/A | N/A | N/A | | default | routed | 192.168.122.0/24 | True | default | nat | +-----------------+---------+---------------------+-------+-------------------+----------+I configured a DHCP server in the VXLAN network with DNSMasq, the relevant configuration can be found below:
Attention
I’m running this DNSMasq in one of my hypervisors, node1 to be exact. Note that this node will act as router for the VXLAN network as well.
dhcp-range=br0,172.16.30.50,172.16.30.200,255.255.255.0,24h
dhcp-option=br0,option:dns-server,172.16.30.1
dhcp-option=br0,option:ntp-server,172.16.30.1
dhcp-option=br0,option:router,172.16.30.1
We can plug a new VM into this network, I’ll run the command below in both hypervisors:
kcli download image centos9stream
kcli create vm -i centos9stream -P nets=[br0] -P name=vm-hypervisorX
If I list the VMs in both hypervisors this is what I see:
Hypervisor 1:
kcli list vm+------------------+--------+---------------+ | Name | Status | Ip | +------------------+--------+---------------+ | vm-hypervisor1 | up | 172.16.30.59 | +------------------+--------+---------------+Hypervisor 2:
kcli list vm+------------------+--------+----------------+ | Name | Status | Ip | +------------------+--------+----------------+ | vm-hypervisor2 | up | 172.16.30.143 | +------------------+--------+----------------+
As you can see both VMs got their IP via DHCP, we could have used static addressing as well. We can access one of the VMs and ping the other one.
kcli ssh vm-hypervisor1[cloud-user@vm-hypervisor1 ~]$ ping -c1 172.16.30.143 PING 172.16.30.143 (172.16.30.143) 56(84) bytes of data. 64 bytes from 172.16.30.143: icmp_seq=1 ttl=64 time=1.94 ms --- 172.16.30.143 ping statistics --- 1 packets transmitted, 1 received, 0% packet loss, time 0ms rtt min/avg/max/mdev = 1.935/1.935/1.935/0.000 msWe were able to reach the other VM, if we try now to access internet or any other network not directly connected to our hypervisor node doing the routing this is what happens:
[cloud-user@vm-hypervisor1 ~]$ ping -c1 1.1.1.1PING 1.1.1.1 (1.1.1.1) 56(84) bytes of data. From 172.16.30.1 icmp_seq=1 Time to live exceeded --- 1.1.1.1 ping statistics --- 1 packets transmitted, 0 received, +1 errors, 100% packet loss, time 0msIf we want this VXLAN to access other networks we need to NAT the traffic, we can do that by running the following command in the hypervisor node doing the routing. Hypervisor 1 in my case:
sudo iptables -t nat -A POSTROUTING -s 172.16.30.0/24 -j MASQUERADEIf we try the ping again:
[cloud-user@vm-hypervisor1 ~]$ ping -c1 1.1.1.1PING 1.1.1.1 (1.1.1.1) 56(84) bytes of data. 64 bytes from 1.1.1.1: icmp_seq=1 ttl=41 time=27.2 ms --- 1.1.1.1 ping statistics --- 1 packets transmitted, 1 received, 0% packet loss, time 0ms rtt min/avg/max/mdev = 27.175/27.175/27.175/0.000 ms
Cleaning up the environment
In case we want to get rid of this setup we can run the following commands.
Make sure all VMs using the VXLAN network are stopped and removed from the network.
In Hypervisor 1 run:
sudo nmcli con del br0
sudo nmcli con del to-node2
sudo systemctl stop wg-quick@wg0.service
sudo systemctl disable wg-quick@wg0.service
sudo iptables -t nat -D POSTROUTING -s 172.16.30.0/24 -j MASQUERADE
In Hypervisor 2 run:
sudo nmcli con del br0
sudo nmcli con del to-node1
sudo systemctl stop wg-quick@wg0.service
sudo systemctl disable wg-quick@wg0.service
Alternative commands to nmcli
In case you don’t have nmcli in your environment you can use the following IP commands instead:
Hypervisor 1
sudo ip link add name br0 type bridge stp_state 0
sudo ip address add dev br0 172.16.30.1/24
sudo ip link add to-node2 type vxlan remote 172.16.0.2 id 1 dstport 4789
sudo ip link set up dev br0
sudo ip link set up to-node2
sudo ip link set to-node2 master br0
Hypervisor 2
sudo ip link add name br0 type bridge stp_state 0
sudo ip address add dev br0 172.16.30.2/24
sudo ip link add to-node1 type vxlan remote 172.16.0.1 id 1 dstport 4789
sudo ip link set up dev br0
sudo ip link set up to-node1
sudo ip link set to-node1 master br0
Cleanup
sudo ip link del br0
sudo ip link del to-node1
sudo ip link del to-node2
References
In order to achieve the work described here I used several resources from different places. I want to thank these wonderful people that created such awesome content I could make this work.