Container Security - Linux Capabilities and Secure Compute Profiles
In this post we are going to see two security mechanisms used in Linux Containers in order to provide a security layer for our workloads.
We will see how Linux Capabilities and Secure Compute Profiles can be used for limiting the attack surface for our containers.
The first part of the blog post will be an introduction to Linux Capabilities and Secure Compute Profiles, second part will show how these technologies work through the use of demos.
Linux Capabilities
For the purpose of permission checks, traditional UNIX implementations distinguish two categories of processes:
- Privileged Processes: Whose effective user ID is
0, referred to as superuser or root. - Unprivileged Processes: Whose effective UID is
nonzero.
Privileged processes bypass all kernel permissions checks, on the other hand, unprivileged processes are subject to full permissions checking based on the processes credentials. Usually effective UID, effective GID and supplementary group list.
Starting with kernel 2.2, Linux divides the privileges traditionally associated with superuser into distinct units, known as capabilities, which can be independently enabled and disabled.
You need to keep in mind that capabilities are a per-thread attribute.
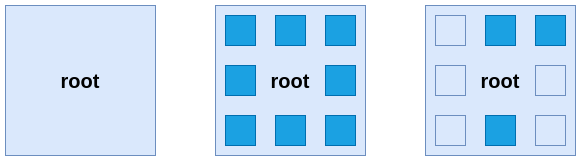
- The first square represents root without capabilities before Linux kernel 2.2.
- The second square represents root with full capabilities.
- The third square represents root with only a few capabilities enabled.
We can say that the power of root comes from the capabilities it can use rather than from being root itself. This will be important to understand that even if a container is running as root UID it doesn’t mean that it has full root privileges.
At the moment of this writing there are a total of 41 capabilities, you can find the list here. We are going to see some of the most common ones:
| Capability | Allows |
|---|---|
| NET_RAW | Use RAW and PACKET sockets |
| SETUID | Make arbitrary manipulations of process UIDs |
| CHOWN | Marke arbitrary changes to file UIDs and GIDs |
| SYS_PTRACE | Trace arbitrary processes using ptrace |
| SYS_TIME | Set system clock |
Container runtimes have some of these capabilities enabled by default, for example, you can check the default capabilities enabled by the CRI-O runtime on its version v1.21 here.
One potential question you might have could be “What capabilities are required for my application?” - Well, knowing which capabilities are required by your applications requires a very good knowledge of the application by the developer. There is no magic tool that will tell you which capabilities are actually required.
Secure Compute Profiles (Seccomp)
Containers typically run a single application with a set of well-defined tasks, these applications usually require a small subset of the underlying operating system kernel APIs. For example, an httpd server does not require the mount syscall at all, why should the app have access to this syscall?
In order to limit the attack vector of a subverted process running in a container, the seccomp Linux kernel feature can be used to limit which syscalls a process has access to. We can think of seccomp like a firewall for syscalls.
Creating your own seccomp profiles can be tedious and often requires deep knowledge of the application. For example, a developer must be aware that a framework that sets up a network server to accept connections would translate into calling socket, bind and listen system calls. This time, there is some tooling that can help us getting the list of syscalls used by our applications:
- Keep in mind when using the oci hook for creating seccomp profiles for runtimes such as CRI-O that you need to run the hook with the proper container runtime, e.g:
crunvsrunc.
- Keep in mind when using the oci hook for creating seccomp profiles for runtimes such as CRI-O that you need to run the hook with the proper container runtime, e.g:
etc
Secure Compute Profiles can be defined using JSON, below we will see an example:
{
    "defaultAction": "SCMP_ACT_ERRNO",
    "architectures": [
        "SCMP_ARCH_X86_64",
        "SCMP_ARCH_X86",
        "SCMP_ARCH_X32"
    ],
    "syscalls": [
        {
            "names": [
                "accept4",
                "epoll_wait",
                "pselect6",
                "futex"
            ],
            "action": "SCMP_ACT_ALLOW"
        }
    ]
}
Profiles can have multiple actions configured:
| Action | Result |
|---|---|
| SCMP_ACT_ALLOW | Allows the use of the specified syscalls |
| SCMP_ACT_ERRNO | Denies the use of the specified syscalls |
| SCMP_ACT_LOG | Allows the use of any syscalls, but logs in the audit log the ones that are not explicitly permitted |
Above policy can be interpreted as:
- The default action for syscalls not defined in the seccomp is deny, that means that we will only allow running syscalls explicitly permitted in our policy.
- The policy applies to the system architectures defined in
architectures. - We have a group of 4 syscalls that are permitted:
accept4,epoll_wait,pselect6andfutex.
Linux Capabilities in Action
In the previous section on capabilities we said that capabilities are a per-thread attribute, and as such every thread has the following capability sets containing zero or more capabilities:
- Permitted Set
- Capabilities that the thread may assume. It also limits the capabilities that may be added to the inheritable set by a thread that has the SETPCAP capability in its effective set. If a thread drops a capability from its permitted set, it can never reacquire that capability unless it execve either a SETUID program or a program with that capability set as a permitted file capability.
- Inheritable Set
- Capabilities preserved across an execve. Inheritable capabilities remain inheritable when executing any program, and they will be added to the permitted set when executing a program that has that capability set as inheritable file capability. Keep in mind that inheritable capabilities are not generally preserved across execve when running as a non-root user, for such uses cases consider using ambient capabilities.
- Effective Set
- Capabilities used by the kernel to perform permission checks for the thread.
- Bounding Set
- Used to limit which capabilities can be gained during execve.
- Ambient Set
- Capabilities that are preserved across an execve of a program that is not privileged. No capability can ever be ambient if it’s not both permitted and inheritable. Executing a program that changes UID or GID due to SETUID or SETGID bits or executing a program that has file capabilities set will clear the ambient set. Ambient capabilities are added to the permitted set and assigned to the effective set when execve is called.
On top of thread capabilities we have file capabilities, which are capabilities assigned to an executable file and that upon execution will be granted to the thread. These file capabilities are stored using one bit, but they act as different file capability sets:
- Permitted Set
- Capabilities that are automatically permitted to the thread, regardless of the thread’s inheritable capabilities.
- Inheritable
- Capabilities that are ANDed with the thread’s inheritable set to determine which inheritable capabilities are enabled in the permitted set of the thread after the execve.
- Effective
- This is not a capability set, but rather just a single bit. If set, during an execve all of the thread’s permitted capabilities are also raised in the effective set. If not set, after an execve, none of the thread’s permitted capabilities are raised in the effective set. Enabling a capability in the file effective set implies that the thread will acquire that capability in its permitted set.
Capabilities and containers
Before we get started with hands-on scenarios we need to know how capabilities behave in containers, specially what’s the different behaviours we get when running a container as root or as a non-root user.
Containers running with UID 0
When we run a container with UID 0, default capabilities configured by the runtime will be configured in the effective set for the container thread.
Podman default runtime capabilities can be found here. You can also modify the defaults using the Podman’s configuration file.
Container running with nonroot UIDs
When we run a container with a nonroot UID, default capabilities configured by the runtime are dropped, they will be in the inherited set and we can use file capabilities for such cases. We can also explicitly request a list of capabilities to the container runtime so those will be added to the container thread effective set.
In the next scenarios we will show the differences.
Get capabilities assigned to a process
During the following scenarios we will get capabilities assigned to processes, there are different ways of getting this information, let’s see some.
Let’s run a test container, this container has an application that listens on a given port, but that’s not important for now:
podman run -d --rm --name reversewords-test quay.io/mavazque/reversewords:latestWe can always get capabilities for a process by querying the
/procfilesystem:# Get container's PID CONTAINER_PID=$(podman inspect reversewords-test --format \{\{.State.Pid\}\}) # Get caps for a given PID grep Cap /proc/${CONTAINER_PID}/statusNOTE: The command returns the different capability sets in hex format, we will use a tool to decode that information.
CapInh:	00000000800405fb
CapPrm:	00000000800405fb
CapEff:	00000000800405fb
CapBnd:	00000000800405fb
CapAmb:	0000000000000000
We can see that the
inherited,permitted,effectiveandboundingsets share the same capabilities, let’s decode them:capsh --decode=00000000800405fbNOTE: As you can see below capabilities were assigned since those are the runtime’s defaults and our container is running with UID 0 so no capabilities were dropped.
0x00000000800405fb=cap_chown,cap_dac_override,cap_fowner,cap_fsetid,cap_kill,cap_setgid,cap_setuid,cap_setpcap,cap_net_bind_service,cap_sys_chroot,cap_setfcapWe can use
podman inspectas well:podman inspect reversewords-test --format \{\{.EffectiveCaps\}\}[CAP_CHOWN CAP_DAC_OVERRIDE CAP_FOWNER CAP_FSETID CAP_KILL CAP_NET_BIND_SERVICE CAP_SETFCAP CAP_SETGID CAP_SETPCAP CAP_SETUID CAP_SYS_CHROOT]We can stop the test container now:
podman stop reversewords-test
Container running with UID 0 vs container running with nonroot UID
We explained the different behaviour between a container running with root’s UID and with nonroot UID, now let’s see it in action.
Run our test container with a root uid and get it’s capabilities:
# Run the container
podman run --rm -it --user 0 --entrypoint /bin/bash --name reversewords-test quay.io/mavazque/reversewords:ubi8
# Now we're inside the container, let's get caps
grep Cap /proc/1/status
CapInh: 00000000800405fb CapPrm: 00000000800405fb CapEff: 00000000800405fb CapBnd: 00000000800405fb CapAmb: 0000000000000000We can decode the capabilities in the
effectiveset:capsh --decode=00000000800405fb0x00000000800405fb=cap_chown,cap_dac_override,cap_fowner,cap_fsetid,cap_kill,cap_setgid,cap_setuid,cap_setpcap,cap_net_bind_service,cap_sys_chroot,cap_setfcapWe can exit our container now:
exitNow it’s time to run our test container with a nonroot uid:
# Run the container podman run --rm -it --user 1024 --entrypoint /bin/bash --name reversewords-test quay.io/mavazque/reversewords:ubi8 # Now we're inside the container, let's get caps grep Cap /proc/1/statusNOTE: As you can see since we’re running with a nonroot UID our
permittedandeffectiveset were cleared. We could still use file capabilities.CapInh: 00000000800405fb CapPrm: 0000000000000000 CapEff: 0000000000000000 CapBnd: 00000000800405fb CapAmb: 0000000000000000We can exit our container now:
exitOn top of file capabilities, we can request specific capabilities to the runtime and they will be assigned to the corresponding sets even if we are running with a nonroot uid:
# Run the container and request the NET_BIND_SERVICE capability podman run --rm -it --user 1024 --cap-add=cap_net_bind_service --entrypoint /bin/bash --name reversewords-test quay.io/mavazque/reversewords:ubi8 # Now we're inside the container, let's get caps grep Cap /proc/1/statusNOTE: You can see that we got some capability in the
permittedandeffectiveset, let’s decode it.CapInh: 00000000800405fb CapPrm: 0000000000000400 CapEff: 0000000000000400 CapBnd: 00000000800405fb CapAmb: 0000000000000400Decode the capability:
capsh --decode=0000000000000400NOTE: As expected, the NET_BIND_SERVICE capability was added to the containers
permittedandeffectiveset.0x0000000000000400=cap_net_bind_serviceWe can exit our container now:
exit
Real world scenario
We said that the power of root comes from its capabilities and not from just being root, in the next scenario we are going to show how we can use capabilities in order to run root-like actions with nonroot users.
We have our test application, it runs a small web-service on a given port. We want to bind to port 80, but as you might know, binding to ports under 1024 is a privileged action. Let’s see how capabilities can help us here.
Using thread capabilities
We can control in which port our application listens by using the
APP_PORTenvironment variable. Let’s try to run our application in a non-privileged port with a non-privileged user:podman run --rm --user 1024 -e APP_PORT=8080 --name reversewords-test quay.io/mavazque/reversewords:ubi8NOTE: As you can see the application is running properly.
2021/03/27 17:12:49 Starting Reverse Api v0.0.18 Release: NotSet
2021/03/27 17:12:49 Listening on port 8080
You can stop the container by pressing
Ctrl+CNow, let’s try to bind to port 80
podman run --rm --user 1024 -e APP_PORT=80 --name reversewords-test quay.io/mavazque/reversewords:ubi8NOTE: We got a permission denied, if you remember since we’re running with a nonroot UID the capability sets were cleared.
2021/03/27 17:15:56 Starting Reverse Api v0.0.18 Release: NotSet
2021/03/27 17:15:56 Listening on port 80
2021/03/27 17:15:56 listen tcp :80: bind: permission denied
We know that the capability
NET_BIND_SERVICEallows unprivileged processes to bind to ports under 1024, let’s assign this capability to the container and see what happens:podman run --rm --user 1024 -e APP_PORT=80 --cap-add=cap_net_bind_service --name reversewords-test quay.io/mavazque/reversewords:ubi8NOTE: Now the application was able to bind to port 80 even if it’s running with a nonroot user because the capability
NET_BIND_SERVICEwas added to the thread’s effective set.2021/03/27 17:18:07 Starting Reverse Api v0.0.18 Release: NotSet 2021/03/27 17:18:07 Listening on port 80You can stop the container by pressing
Ctrl+C
Using file capabilities
For this example we’re using the same application, but this time we set file capabilities to our application binary using the setcap command:
NOTE: We added the
NET_BIND_SERVICEin theeffectiveandpermittedfile capability set.
setcap 'cap_net_bind_service+ep' /usr/bin/reverse-words
Let’s see what happens when we run this new image:
podman run --rm -it --entrypoint /bin/bash --user 1024 -e APP_PORT=80 --name reversewords-test quay.io/mavazque/reversewords-captest:latestInstead of running the application directly, we opened a shell. Let’s review the file capabilities assigned to our binary:
getcap /usr/bin/reverse-wordsNOTE: As previously mentioned,
NET_BIND_SERVICEcapability was added./usr/bin/reverse-words = cap_net_bind_service+epLet’s see the container thread capabilities:
grep Cap /proc/1/statusNOTE: We don’t have the
NET_BIND_SERVICEcapability in the effective set, which means that we won’t be able to bind to port 80 under normal circumstances. If we decode theinheritedset we will see that theNET_BIND_SERVICEcapability is present, that means that we should be able to use file capabilities to get that capability in theeffectiveandpermittedset.CapInh: 00000000800405fb CapPrm: 0000000000000000 CapEff: 0000000000000000 CapBnd: 00000000800405fb CapAmb: 0000000000000000Let’s try to run our application:
/usr/bin/reverse-wordsNOTE: We were able to bind to port 80 since the file capability granted access to
NET_BIND_SERVICEto our application thread.2021/03/27 17:26:51 Starting Reverse Api v0.0.18 Release: NotSet 2021/03/27 17:26:51 Listening on port 80We can exit our container now:
exitYou might be thinking that file capabilities can be used to bypass the thread’s capabilities, but that’s not the case. Let’s see what happens when we try to get a capability via file capabilities when the capability we want to get is not in the thread’s
inheritedset:# We explicitly request to drop all capabilities podman run --rm -it --entrypoint /bin/bash --user 1024 --cap-drop=all -e APP_PORT=80 --name reversewords-test quay.io/mavazque/reversewords-captest:latestLet’s see the container thread capabilities:
grep Cap /proc/1/statusNOTE: We don’t have any capability in any capability set for the thread.
CapInh:	0000000000000000
CapPrm:	0000000000000000
CapEff:	0000000000000000
CapBnd:	0000000000000000
CapAmb:	0000000000000000
If we try to run our application:
NOTE: The kernel stopped us from getting the
NET_BIND_SERVICEand thus executing our app.bash: /usr/bin/reverse-words: Operation not permittedWe can exit our container now:
exit
Capability aware programs
Very similar to file capabilities there are programs that are capability aware, that happens when they use specific libraries that are used for managing capabilities at a thread level.
In the previous example, our application raised the NET_BIND_SERVICE capability in the effective set for the whole execution time. Capability aware programs are much smarter and they only raise capabilities when they’re required and they drop those capabilities when they’re no longer required.
If our application was that smarter it would’ve raised the NET_BIND_SERVICE before binding to port 80, and once binded it would’ve dropped the capability since it was not required anymore.
For example, we can build capability aware programs in go by using a library like this.
Secure Compute Profiles in Action
In this scenario we will generate a seccomp profile for our container, in order to do that we will use the OCI Hook project.
NOTE: The
OCI Hookrequires us to run containers with a privileged user, that’s why we will be usingsudoin the next commands.
Run a container that runs
ls /command and tell the hook to save theseccompprofile at/tmp/ls.json:sudo podman run --rm --annotation io.containers.trace-syscall="of:/tmp/ls.json" fedora:32 ls / > /dev/nullThe hook generated the
seccompprofile at/tmp/ls.json, let’s review it:cat /tmp/ls.json | jqNOTE: We can see the
syscallsthat were made by our container in order to run thels /command.{ "defaultAction": "SCMP_ACT_ERRNO", "architectures": [ "SCMP_ARCH_X86_64" ], "syscalls": [ { "names": [ "access", "arch_prctl", "brk", "capset", "close", "execve", "exit_group", "fstat", "getdents64", "ioctl", "mmap", "mprotect", "munmap", "openat", "prctl", "pread64", "prlimit64", "read", "rt_sigaction", "rt_sigprocmask", "select", "set_robust_list", "set_tid_address", "setresgid", "setresuid", "stat", "statfs", "write" ], "action": "SCMP_ACT_ALLOW", "args": [], "comment": "", "includes": {}, "excludes": {} } ] }Now that we have a
seccompprofile that only has the required syscalls for our application to work, we can run the container with this profile:podman run --rm --security-opt seccomp=/tmp/ls.json fedora:32 ls / > /dev/nullIt worked!, let’s see what happens if we change the
lscommand a bit:podman run --rm --security-opt seccomp=/tmp/ls.json fedora:32 ls -l / > /dev/nullNOTE: The
ls -lcommand failed because it requires additionalsyscallsthat are not permitted by ourseccompprofile.ls: cannot access '/': Operation not permittedThe hook allow us to pass an input file that will be used as baseline, then we will log the required additional syscalls into a new output file:
sudo podman run --rm --annotation io.containers.trace-syscall="if:/tmp/ls.json;of:/tmp/lsl.json" fedora:32 ls -l / > /dev/nullAn updated
seccompprofile has been generated at/tmp/lsl.json, let’s compare both profiles:diff <(jq -S . /tmp/ls.json) <(jq -S . /tmp/lsl.json)NOTE: We can see the additional
syscallsrequired by thels -lcommand below.42a43,61 > }, > { > "action": "SCMP_ACT_ALLOW", > "args": [], > "comment": "", > "excludes": {}, > "includes": {}, > "names": [ > "connect", > "fcntl", > "futex", > "getpid", > "getxattr", > "lgetxattr", > "lseek", > "lstat", > "readlink", > "socket" > ]If we try to use the new
seccompprofile we will be able to run thels -lcommand this time:podman run --rm --security-opt seccomp=/tmp/lsl.json fedora:32 ls -l / > /dev/null
Closing Thoughts
In this blog post we introduced two security technologies in containers that can be used to limit the attack surface in our applications running in containers. In a future blog post we will see how these technologies can be leveraged in Kubernetes.